White Balance Correction by Using Photoshop

White balance is IMPORTANT – but most of (newbie) photographers always use automatic white balance, a little bit ridiculous but that’s the fact. Honestly most of times I also use auto white balance although I know I can’t get the correct color/tone. Since I still use AWB but want to get the correct color then I need to correct the WB (in post processing) by using Photoshop.
Before I tell you how to correct white balance, I want to make sure that you know what is white balance and why it is so important. You can check this link – you don’t need to get through into mathematics equation @@. You can see this link and other link to understanding white balance practically. If you are interesting about custom white balance you also can check grey card – most of professional photographers use it to set custom white balance. Some people also use Wallace ExpoDisc instead of grey card.
Now we are ready to go into the tutorial:
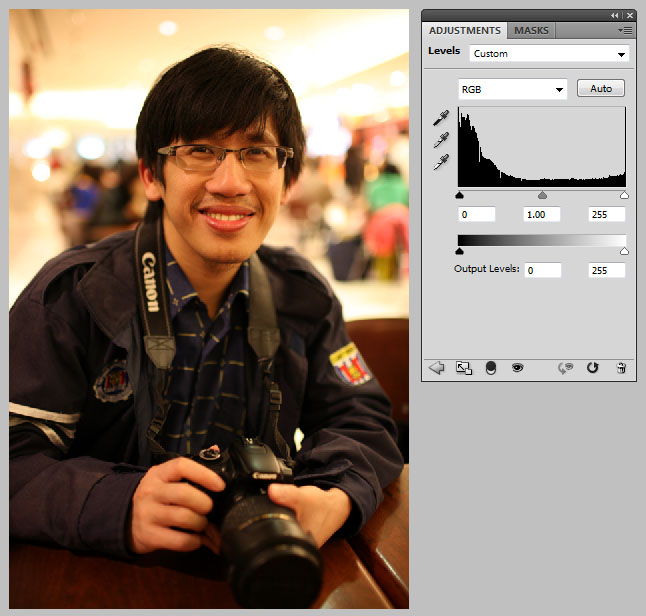
1. Open your photo. I’ll use my photo – this photo is taken by Jeffrey (thanks for taking this photo @@). This photo is taken by auto white balance, you can see the color is somewhat strange – the tone/color was influenced by the lighting (inside this building).

2. Add level adjustment layer then click auto (then you see nothing change hehe….) – Honestly, for some photos this is the quickest method to correct white balance, but in this tutorial I try to give sample of photo that can’t be corrected easily just by clicking auto.

3. Then if “auto” can’t solve this problem, what’s the next step we should do? I think if auto can’t solve this problem, you can use eyedropper (see photo below). There are 3 eyedroppers – these eyedroppers can help you to sample in image the black point, grey point, or white point. Usually I just use 2 eyedroppers, the first and third eyedropper(I highlighted in photo below). First eyedropper can be use to sample in image the black point – you can see some areas that I highlighted with red color. Third eyedropper can be use to sample in image the white point – you can see some sample areas that I highlighted with green color. The process to get the best sample areas are by trial and error – click some areas and you will know the best sample area.

4. Then you will get this result – some of areas are overexposure, to handle this problem you need to mask some overexposed area:
Before masking:

After masking:

5. This step is just additional step – I just add more local contrast and sharpen the photo to make it looked better. So here is the final result.

Finally I hope you can learn some basic ideas how to correct white balance with Photoshop, just by simple step can improve the quality of your photograph. Hope you like this tutorial – any comments, critiques or suggestions are welcome. Thanks….
Anyway, I have special promo for Outdoor Pre-wedding Service from 2012 Feb, 1 st – July, 31 st . If you’re interested, just click HERE.


Win itu kamera gw yg elo pegang!! hahahha….
yoi jef… kan kamera gue lo yang pegang hahaa…..
Salah satu kelemahan DSLR jef, suaah klo mau moto narsis sendirian kayak cewek2 taiwan pake HP haha…… anyway thanks for take this photo haha…… 🙂
Just dropping by.Btw, you website have great content!
______________________________
Renegade ClickBank Affiliate Banks $127,783 In 30 Days With New Google Software …
Wah…jaket Mesinnya gak ketinggalan ya. Masss
pasti dong…. jaket kebanggaan anak mesin… Solidarity Forever…
gile gong modelnya cakep amatttt…
Super helpful and easy to follow! Thanks for posting!
@crescentmoonpapers:
thanks….
terima kasih mas Edwin atas ilmu fotografinya..semuga mas Edwin tetap berkarya..dan dibaca oleh kami2 yg perlu ini..thanks
VERY good.Thank q.
@venkatesh: your welcome….
hello, great tutorial 🙂
I have one question, what if picture have no blackest and whitest area, if it’s grayed ?
in your example, there is a great white point behinde you and black point on objective… but what in other situation
@klathu:
thanks hehe….
You can choose the second eye dropper if there is no blackest and whitest area… (see in step 3 there are 3 eyedroppers).
a ha… so in that case point of picking is gray-yellowed background ? Am I right ? maybe colour of your face in original picture or roof colour.
@klathu:
For this case, maybe…
But for4 other case maybe different, you can think if you took photo in pub, maybe some people will become red and other become blue hehe…. so which one you choose hehe…
Pingback: Shadow Recovery of Backlight Problem « Just about Photography
kk edwin memang panutan 🙂
bisa aja hehe….
Pingback: White Balance Adjustment (Post Processing) « Just about Photography
Pingback: White Balance Adjustment (Gray Card, Photoshop, DPP) « Overseas Wedding
It’s Really Nice Technique, I just Edited my photo using CS5 using This Technique. It’s clear 🙂
Thanks….
White Balance is STILL OFF….last time I looked at my Canon Camera..that “Canon” just above the lens is White…zoom in and sample that, you’ll have a better looking Photo.
You may want to check this plugin I wrote a while ago:
http://www.deepskycolors.com/archivo/2010/05/26/photoshop-Plug-in-Whitecal.html
It’s free so I’m only “advertising” it FYI.If often works nicely if you select a good white reference and it only takes a couple of clicks.
Thanks, thats good stuff…
Your comment is awaiting moderation.
Hello Edwin, I just discovered your tutorials and now Im super fan, because Im learning so much in such easy ways. I have a question, hope you can help me. In most tutorials you talk about USING MASKING, but I have no clue how to do that, can you help and explain me pleaseeeeeeeeeeee 😉 thanks a lot, because I get stuck in that point. jejeje.
sorry forgot to click the notify me for the answer… txs
Hi Claudia Rodas,
I haven’t write tutorial about masking because there are many tutorials about that in internet. Anyway I can give you one link, I am sure you will understand after read it… http://www.photoshopessentials.com/basics/layers/layer-masks/
Great article! That is the type of information that are supposed to be shared across the net.
Shame on Google for not positioning this put up upper! Come on
over and seek advice from my website . Thanks =)
Pingback: Creating Textures from Stock Photos | Kravall
Thank you for the great tutorial!
your welcome…
Muchos Gracias for your blog post. ddcfkafkdgdd